

On record select event of editable sub grid
The introduction of editable grid in Dynamics 365 is very useful to do inline editing of records. This will now provide the ability to group by or sort by any column, allows filtering & filter controls for lookup fields. We can enable editable grid for an entity and for a sub grid. Let’s look at the steps to activate editable grid for a sub grid.
Scenario:
Let’s consider the scenario that, there is a sub grid (Product entity) in opportunity entity. Whenever we select any product from the sub grid, the product should be added in opportunity product entity.
Step 1:
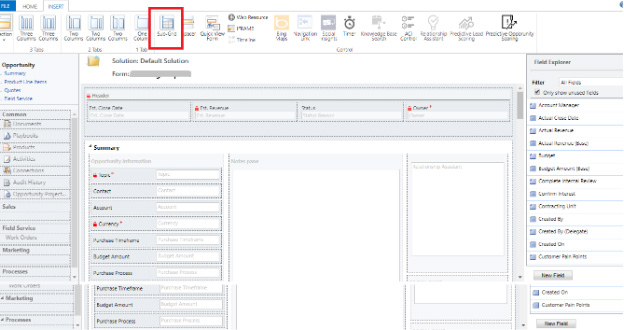
To insert sub grid in opportunity entity, Open the Opportunity form in form editor, click on insert tab, then click on “Sub grid”.
Step 2:
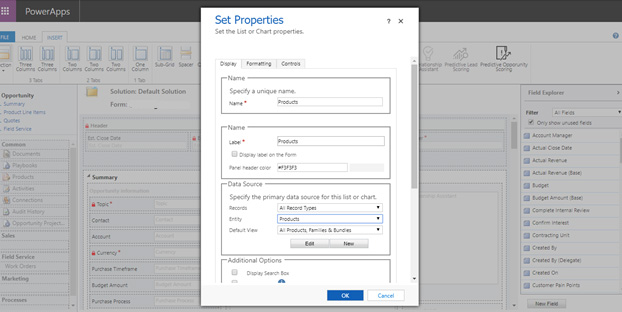
Give a proper name and label for a sub grid. Under data sources choose record type as “All Record Types”. Because there is no relationship between Opportunity and Product. Select default view based on requirement.
Step 3:
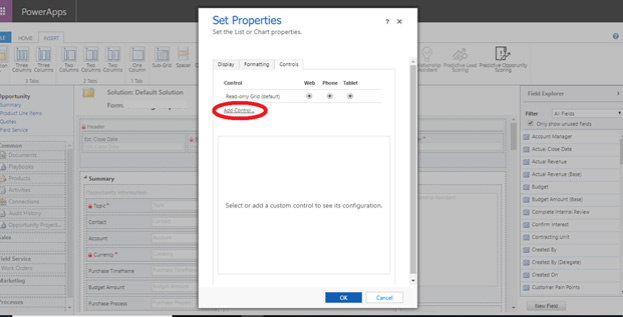
Navigate to “Controls” tab of the sub grid and click on the link button called “Add Control”. Then click on “Editable Grid”.
Step 4:
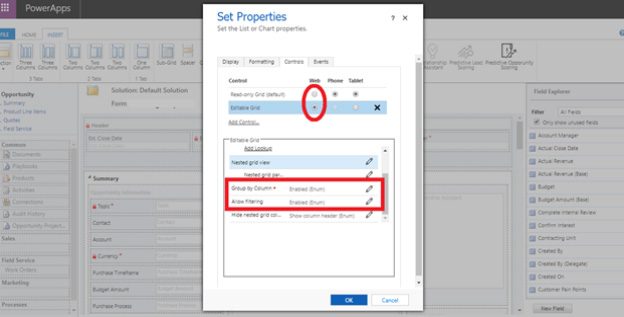
Now it will show the configuration and properties of the editable grid. Choose editable grid control for web. You can also enable it for phone and tablet. There is an option to enable or disable the ‘group by’ and filter option for editable grid.
Step 5:
Navigate to “Events” tab. Add libraries and call functions in sub grid events. Here I have called my function in on record select event of the sub grid. The reference code is below.

Step 6:
Add selected product in opportunity product:
To add the selected product in opportunity product, a validation has been done that the product is already added in opportunity product or not. If “No” then confirmation dialog will be shown, and the product will be added otherwise it just refresh the grid and throw an alert saying that “Already added”. Call the below function in the “on record select” event of sub grid.
function getselectedrecords()
{
var grid = window.parent.document.getElementById(“FilteredProductGrid”);
var OppProductgrid=window.parent.document.getElementById(“opportunityproductsGrid”);
var Oppid=Xrm.Page.data.entity.getId();
var OppGuid= Oppid.substr(1).slice(0, -1);
var selectedRows = Xrm.Page.getControl(“FilteredProductGrid”).getGrid().getSelectedRows();
selectedRows.forEach(function(selectedRow, i) {
var entityGuid = selectedRow.getData().getEntity().getId();
var check=”New”;
XrmServiceToolkit.Rest.RetrieveMultiple(“OpportunityProductSet”, “?$select=OpportunityId,ProductId&$filter=OpportunityId/Id eq (guid'”+OppGuid+”‘)”,
function(results) {
for (var i = 0; i < results.length; i++)
{
var opportunityId = results[i].OpportunityId;
var productId = results[i].ProductId;
if(productId.Id===entityGuid)
{
check="Old";
alert("This product is already added!");
grid.control.Refresh();
OppProductgrid.control.Refresh();
}
}
}, function(error) {
Xrm.Utility.alertDialog(error.message);
}, function() {
//On Complete - Do Something
}, false);
if(check==="New")
{
Xrm.Utility.confirmDialog("Do you want to add this product?", function()
{
var entity = {};
entity.OpportunityId = {
Id: OppGuid,
LogicalName: "opportunity"
};
entity.ProductId = {
Id: entityGuid,
LogicalName: "product"
};
entity.Quantity = parseFloat(1).toFixed(5);
entity.UoMId = {
Id: "9334a168-ca23-47d9-bd38-07d69cfdce1c",
LogicalName: "uom"
};
XrmServiceToolkit.Rest.Create(entity, "OpportunityProductSet", function(result) {
var newEntityId = result.OpportunityProductId;
}, function(error) {
Xrm.Utility.alertDialog(error.message);
}, true);
grid.control.Refresh();
OppProductgrid.control.Refresh();
alert("Selected record Added!");
return;
},
function(){
grid.control.Refresh();
OppProductgrid.control.Refresh();
});
}
});
}
Step 7:
To filter the records in Sub grid: (Optional)
We can filter the sub grid data based on certain criteria. This step is not mandatory. You can use this function if you need to filter data in a sub grid and call this function wherever you need.
function subgridFilter()
{
if(Xrm.Page.ui.getFormType() !=”1″)
{
var grid = window.parent.document.getElementById(“FilteredProductGrid”);
var cityvalue = Xrm.Page.getAttribute(“new_city”).getValue();
var roomsneeded=Xrm.Page.getAttribute(‘new_requiredrooms’).getValue();
var cityid = “00000000-0000-0000-0000-000000000000”;
var cityname;
if (cityvalue != null)
{
var cityid = cityvalue[0].id;
cityname=cityvalue[0].name;
}
if(grid == null)
{setTimeout(function () {subgridFilter(); }, 2000);}
Else{
var GUIDvalue = Xrm.Page.data.entity.getId();
if(grid.control !=null){
var FetchXML =
“
”
”
”
”
”
”
”
”
”
”
”
”
“
grid.control.SetParameter(“FetchXML”, FetchXML);
grid.control.Refresh();
}
else{
setTimeout(function () {subgridFilter(); }, 3000);}
}
}}
 This article was written by Monika Sri